How to upgrade core Clubspeed using auto-upgrader
This article shows you how to upgrade the core of Clubspeed to a new version to add features or fixes.
TABLE OF CONTENTS
- Step 1: Log into the auto-upgrader portal
- Step 2: Add a Release Type
- Step 3: Add a Release
- Step 4: Create a Release Group
- Step 5: Create a Group Schedule
- Step 6: Add Upgrade Details
- Step 7: Add venue to an upgrade group
- Step 8: Add FireDaemon Auto-updater service
- Step 9: Log the upgrade it has been scheduled
- Step 10: Follow up on the upgrade
Step 1: Log into the auto-upgrader portal
- Log into the upgrader portal here: https://checkin.clubspeed.software/autoupdaterportal/
- There should be a username & password box that pops up on the page
Step 2: Add a Release Type
- Expand Release Types on the left-hand side and press Add Release Types
- Type in the name of the release type (usually the version number) in the Release Type field and press Add.
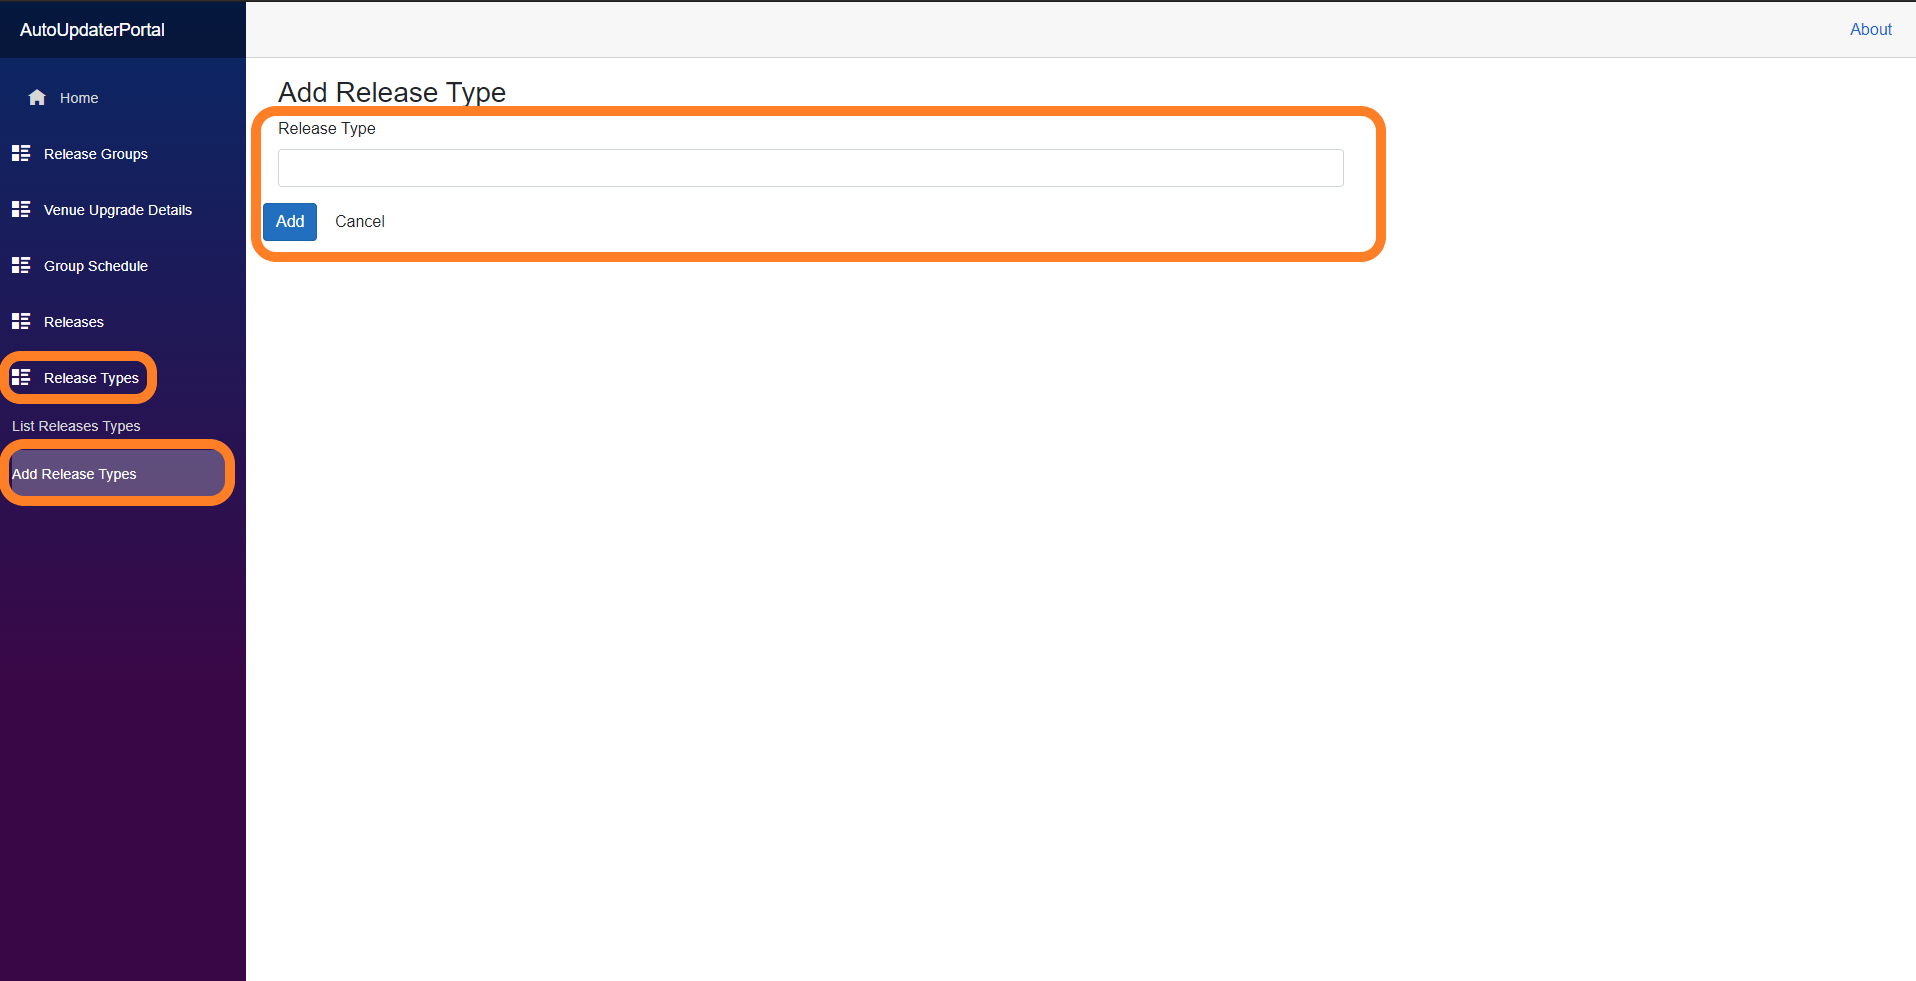
NOTE: You should only need to create a single release type per version. Make sure you are not creating duplicates. You can see a list of the existing ones by viewing the List Release Types section.
Step 3: Add a Release
// Upload the upgrade files
- Expand Releases on the left-hand side and press Add Release
- Type in the Version of this release in the Version Number field and chose the respective Release Type from the Release Type drop-down
- Drag/drop the ZIPED UP file with the build that you wish to use with this release or click on the Browse button to browse your file system and upload the ZIPPED UP filewith the build that you wish to use with this release.
- Let the file upload, it is not uncommon for this to take about half an hour. Don't let your PC go to sleep!
- Once complete make sure to select Update to save your Release.
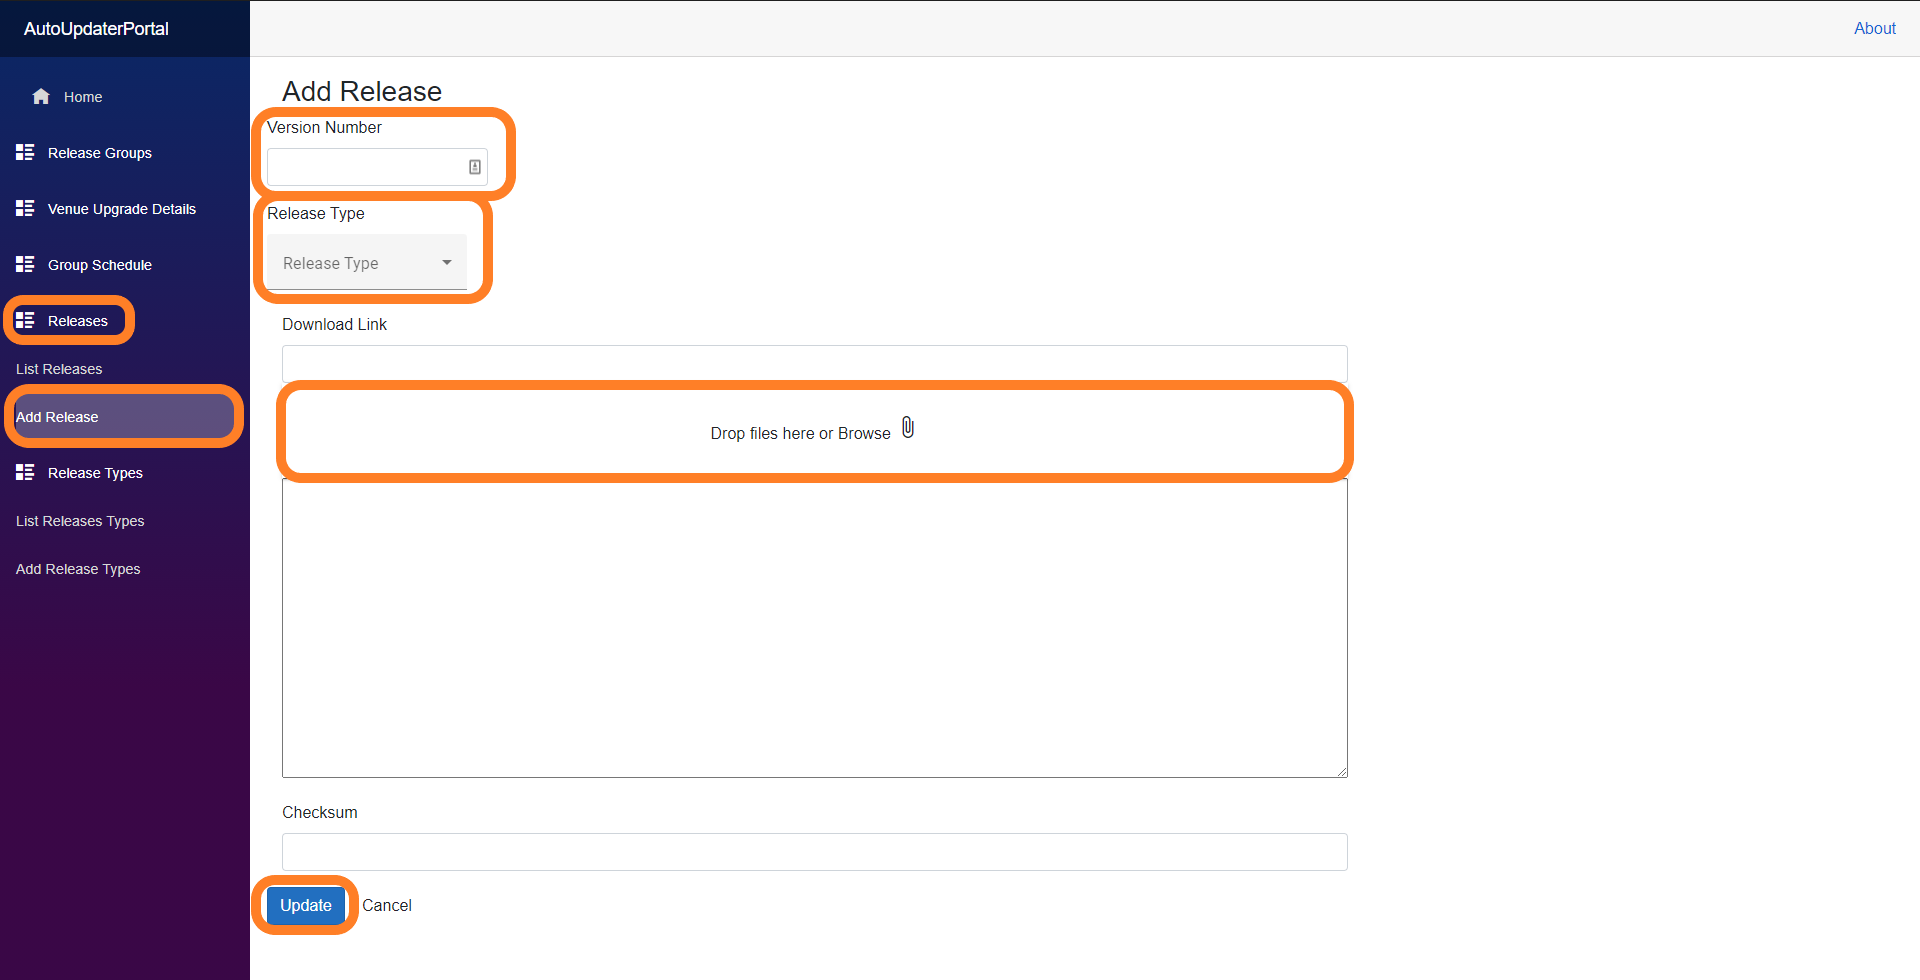
NOTE: You should only need to create a single release per version. Make sure you are not creating duplicates. You can see a list of the existing ones by viewing the List Releases section.
Step 4: Create a Release Group
- Expand Release Groups on the left-hand side and press Add Release Groups
- In the Group Name field, place a friendly name (as of this writing this is the version that the group is going to get updated with) and press Add.
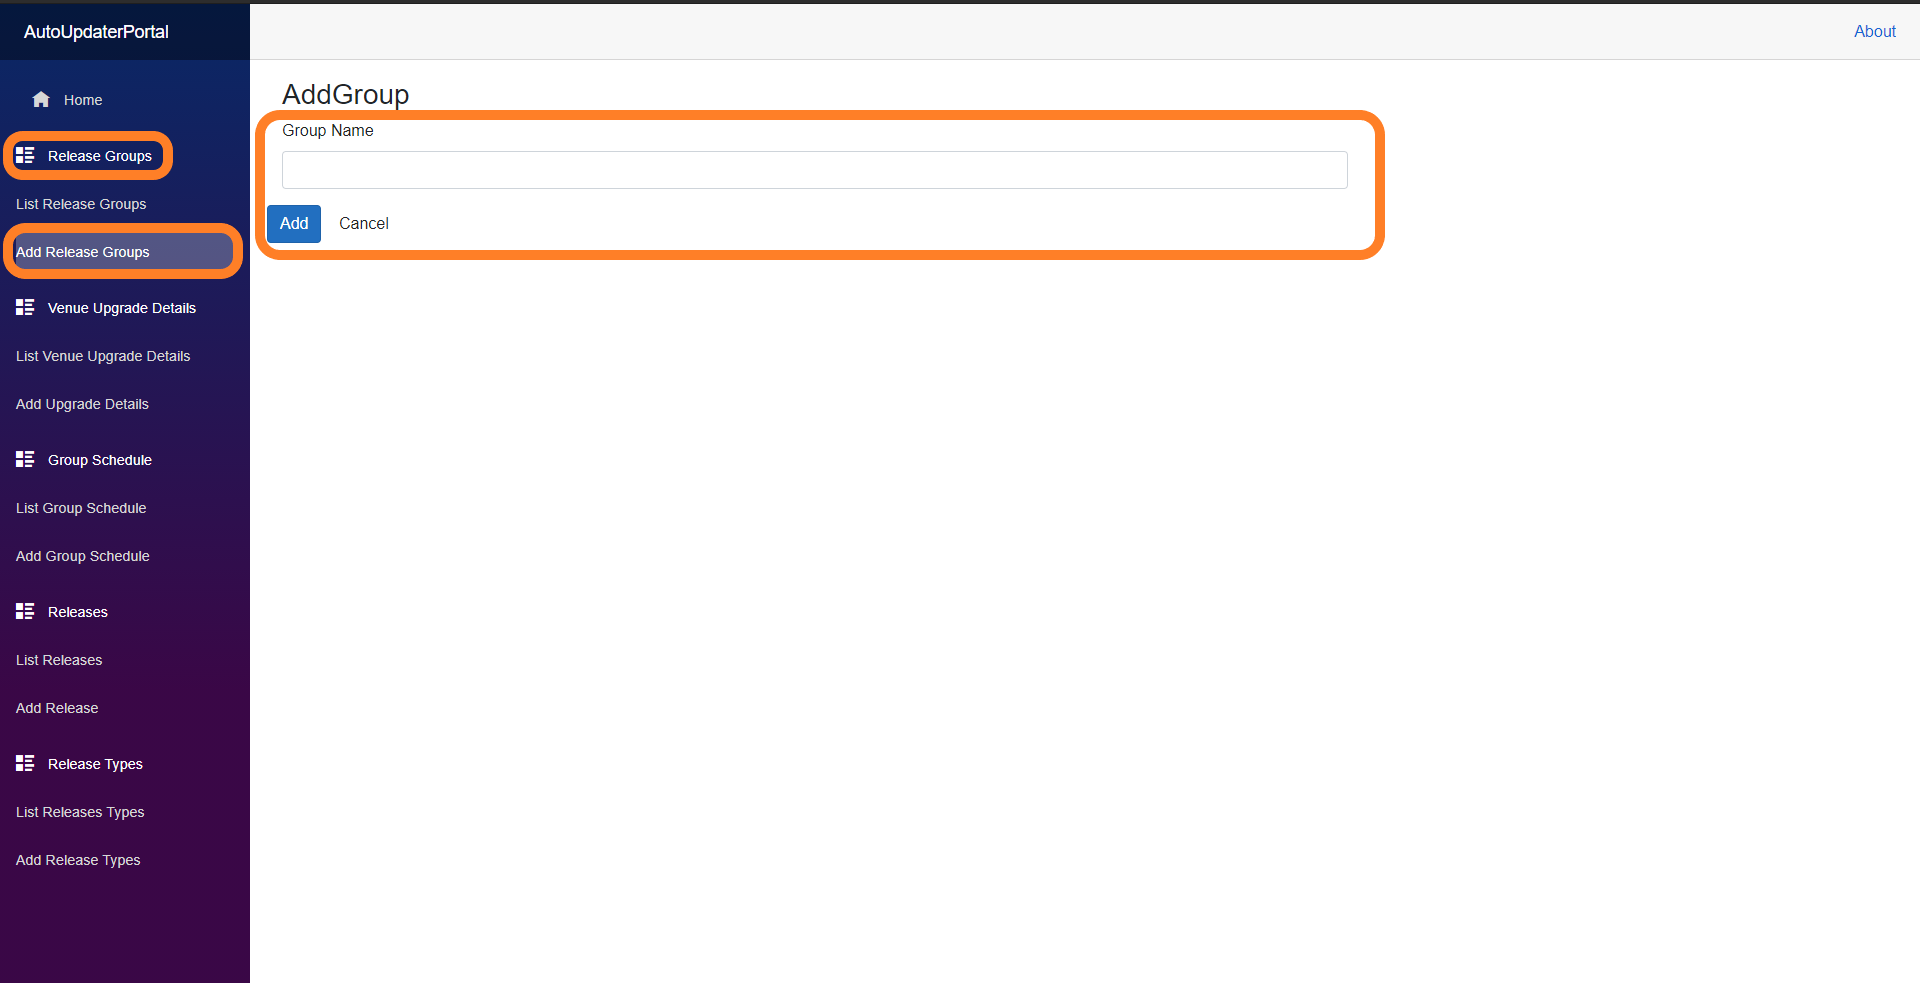
NOTE: You should only need to create a single release group per version. Make sure you are not creating duplicates. You can see a list of the existing ones by viewing the List Release Groups section.
Step 5: Create a Group Schedule
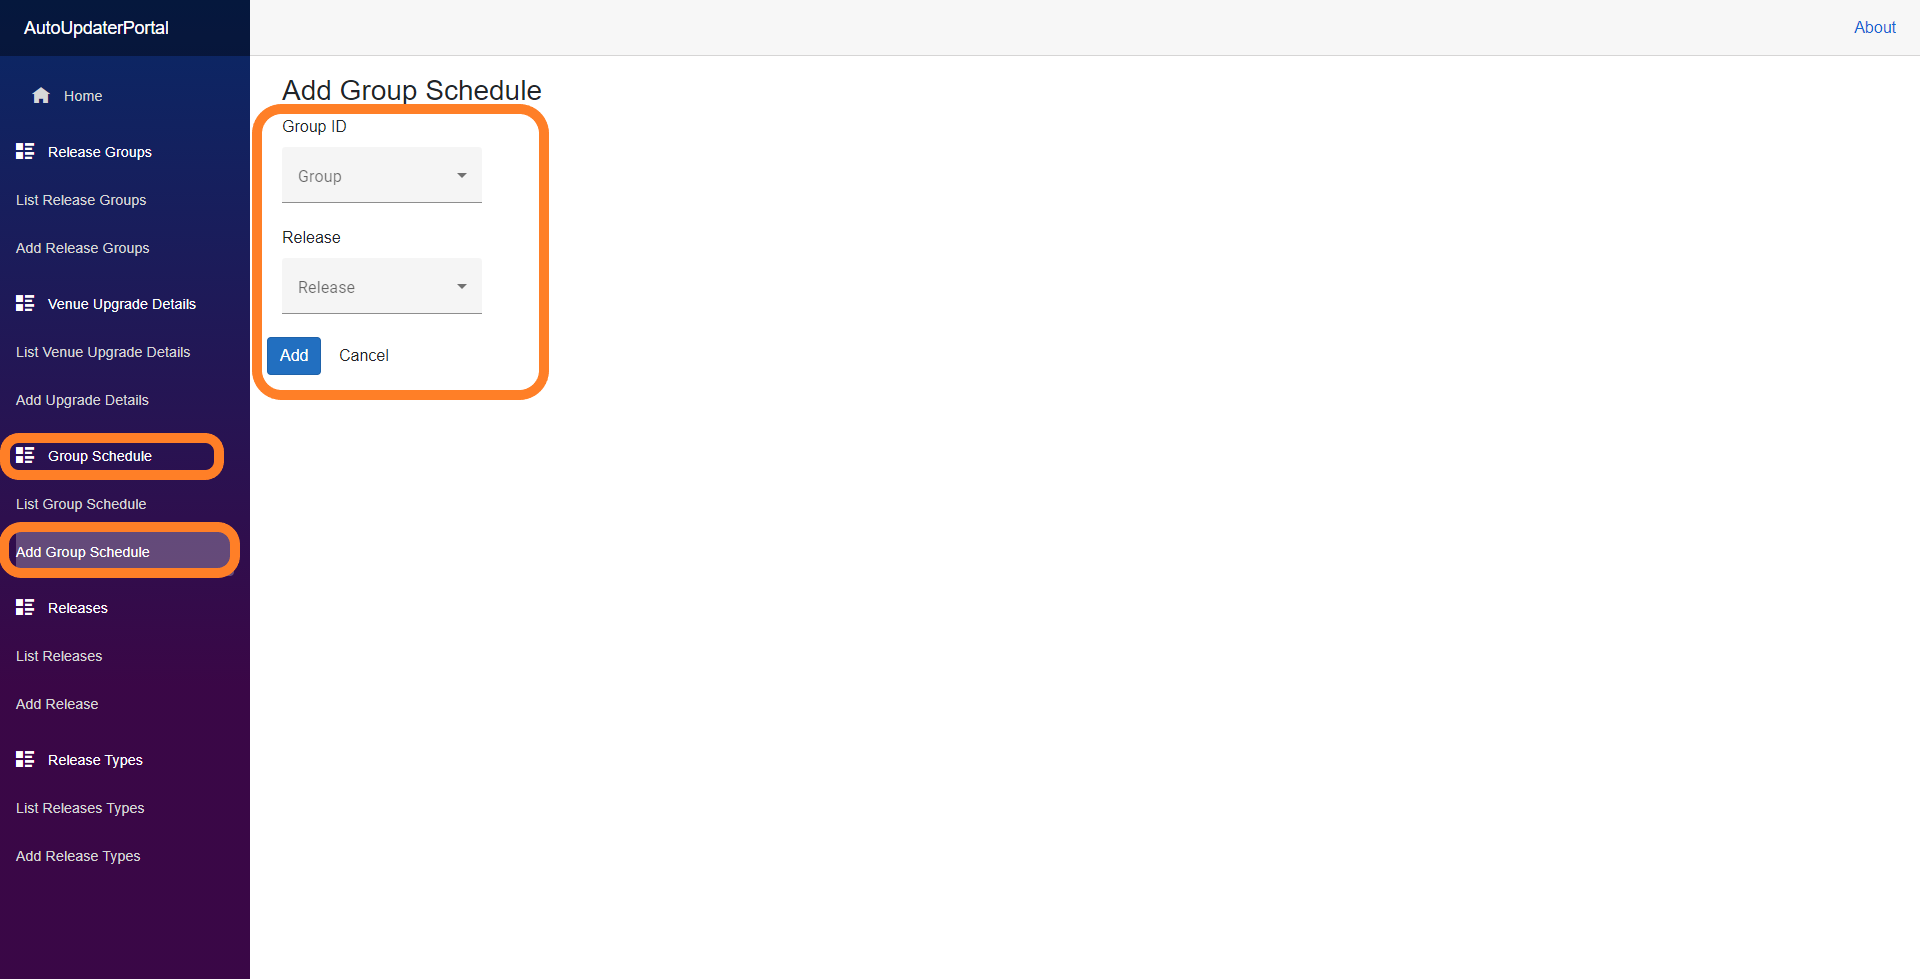
- Expand Group Schedule on the left-hand side and press Add Group Schedule
- In the Group ID drop-down, select the Release Group to be associated to this Group Schedule
- In the Release drop-down, select the Release to be associated to this Group Schedule
- Select Add to save the Group Schedule
NOTE: You should only need to create a single release group per version. Make sure you are not creating duplicates. You can see a list of the existing ones by viewing the List Release Groups section.
Step 6: Add Upgrade Details
//Adds a license name to be added to available locations to be upgraded
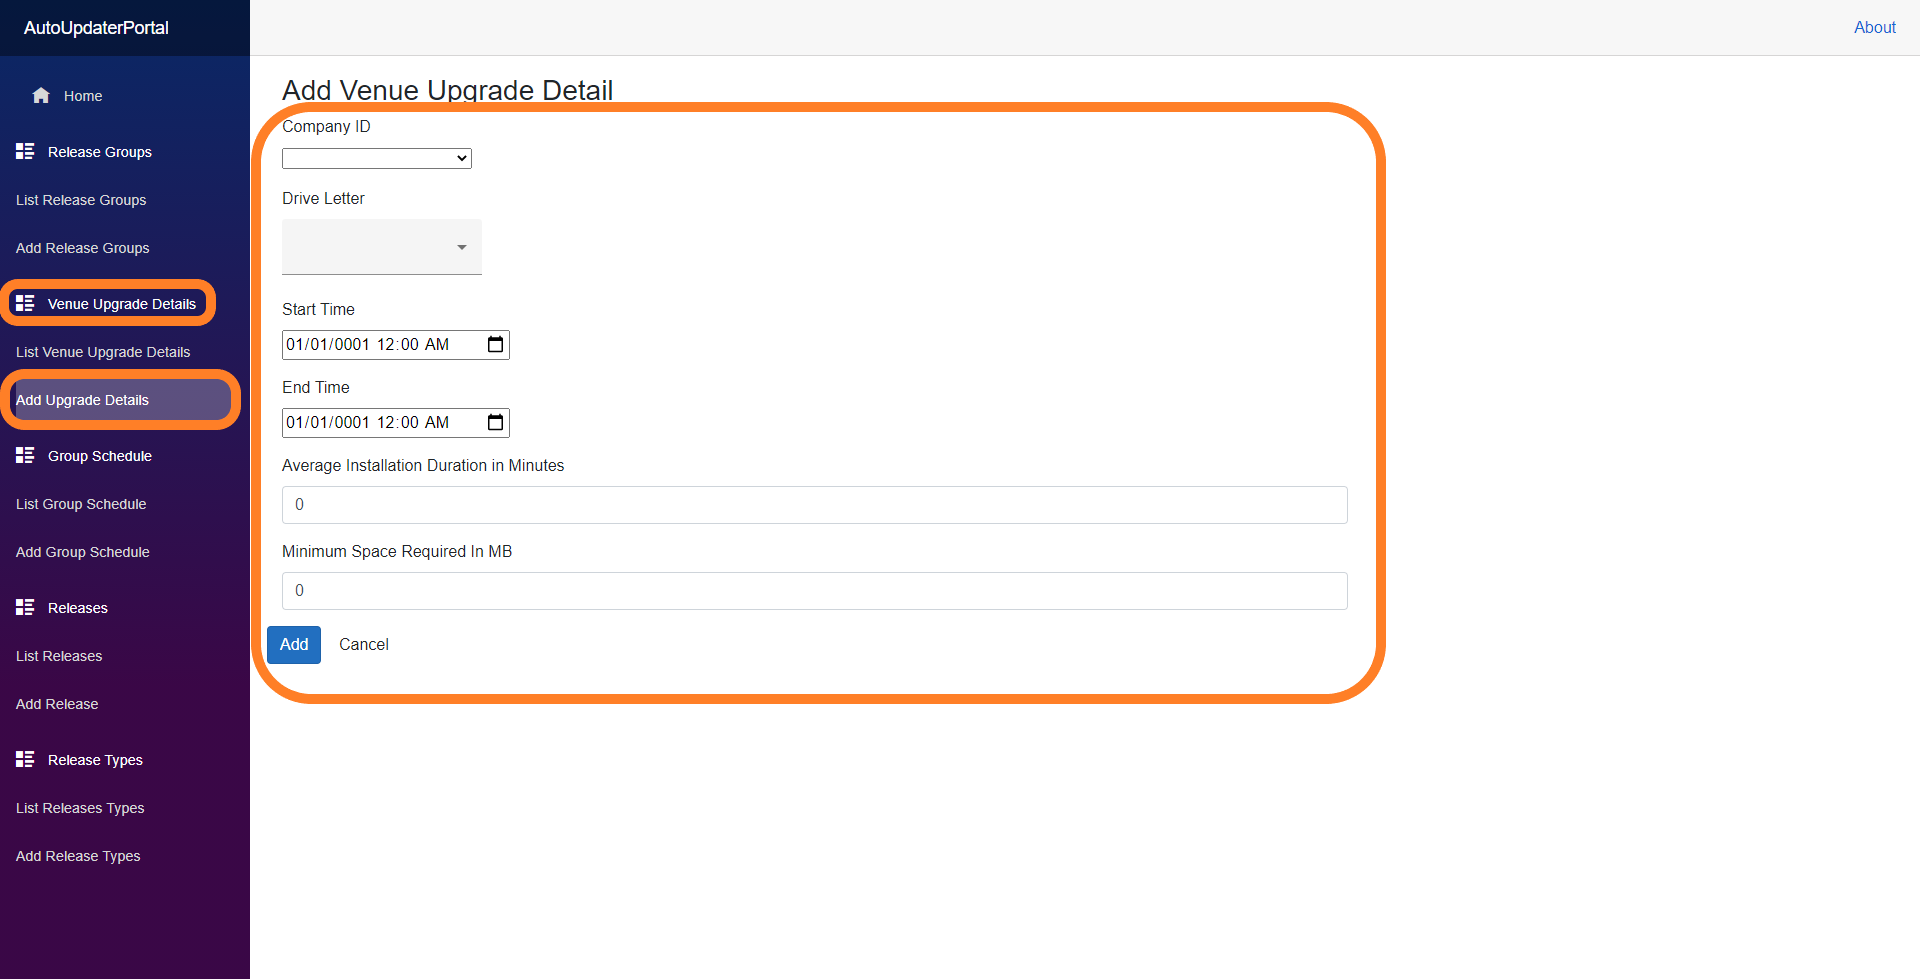
- Expand Venue Upgrade Details on the left-hand side and press Add Upgrade Details
- Choose the license name that you wish to add as available to upgrade from the Company ID drop-down
- In the Drive Letter drop-down, choose the drive letter where the Clubspeed folder is on the server
- Enter the next upgrade start and end time in the Start Time and End TIme pickers (current default hours are 1am to 6am on the same day
- In the Average Installation Duration in Minutes field, place the amount of time in minutes that we will allow the upgrade to complete before it reverts for taking too long (current default is 120 minutes)
- In the Minimum Space Required in MB field, enter the minimum amount of drive space on the server that needs to be free for the upgrade to run (current default is 50000)
NOTE: You should only need to create a single Upgrade Detail per license name. Make sure you are not creating duplicates. You can see a list of the existing ones by viewing the List Venue Upgrade Details section.
Step 7: Add venue to an upgrade group
// Schedule date, time, and version for a venue
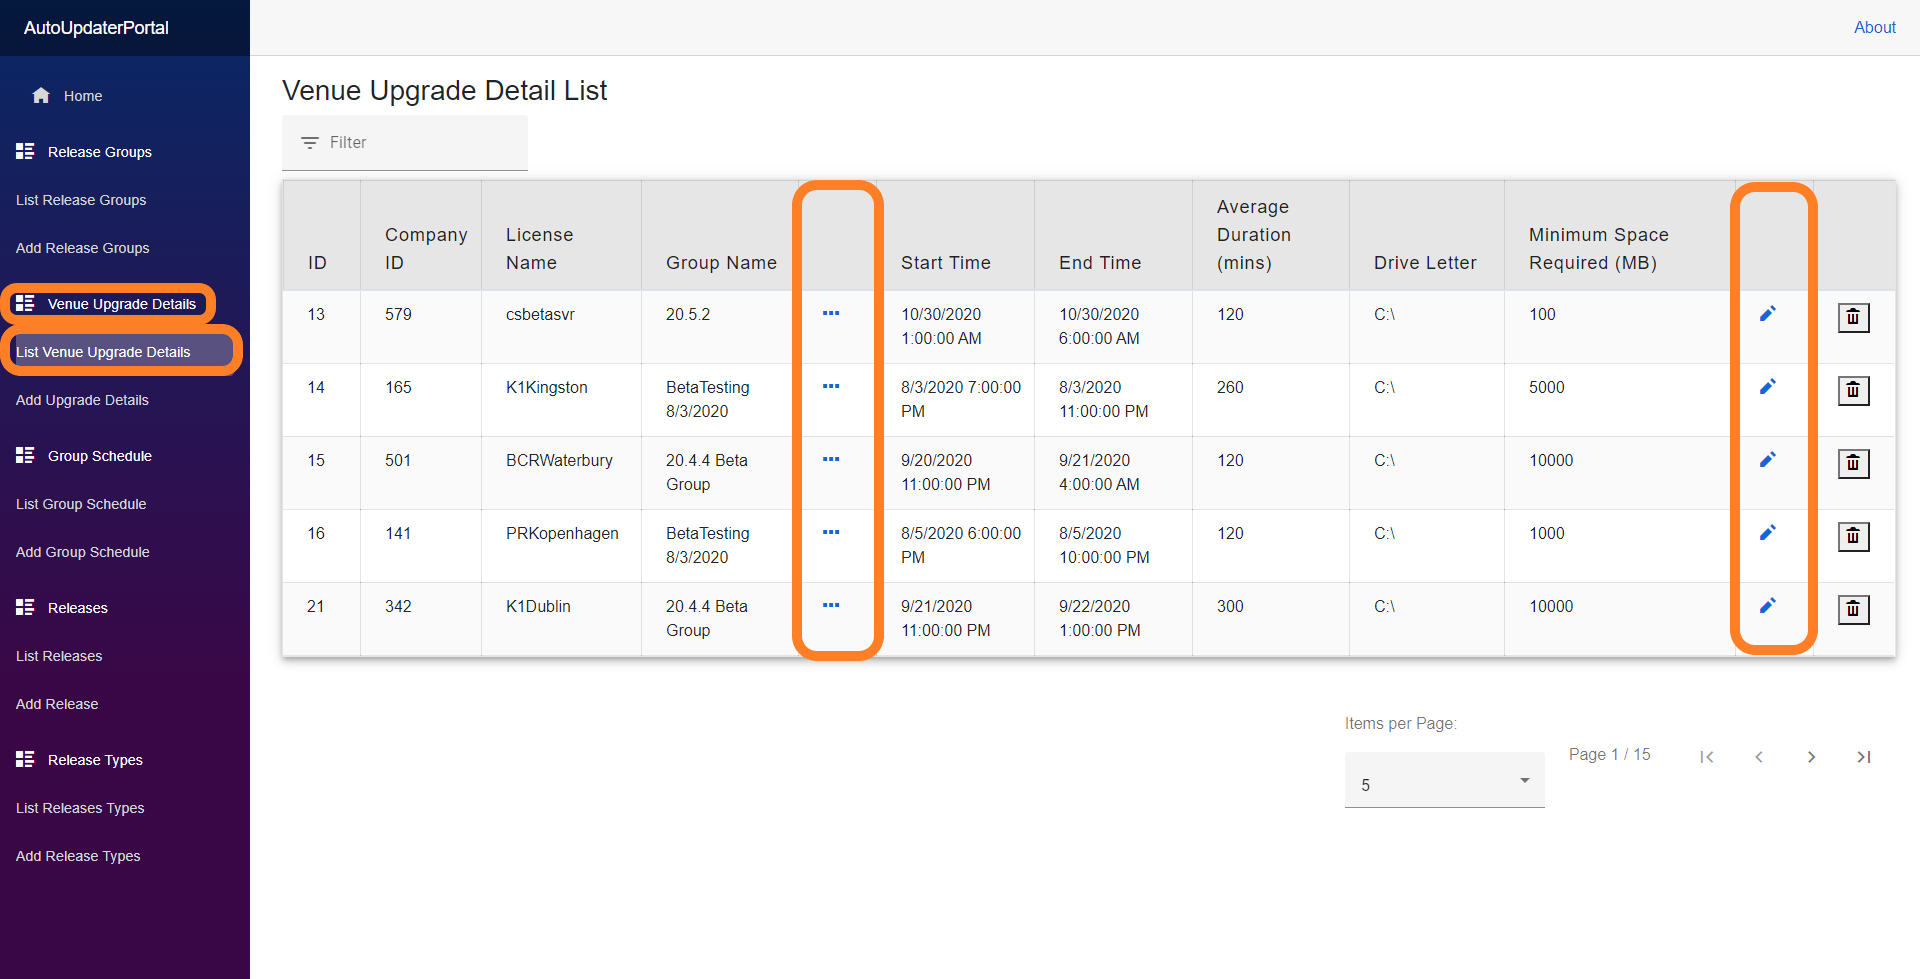
- Expand Venue Upgrade details on the left-hand side and press List Venue Upgrade Details
- Search for the license name in the Filter field at the top left of the page
- On the row for the license name, select the ... or + icon to add the license name to an upgrade group
- This will determine what version the license name will be upgraded with
- If you select the pencil icon you can have access to editing the options from the Upgrade Details section
Step 8: Add FireDaemon Auto-updater service
- Log into the server and open FireDaemon
- Navigate to .../clubspeedapps/utilities/firedaemonservices
- Drag and drop the cs_updater.xml into FireDaemon
You should now see the new updater service in FireDaemon
Step 9: Log the upgrade it has been scheduled
- Open this Sheet
- If there is not a tab for the week you are scheduling, make a copy of the template and rename it for the week you are needing. The name should be the date of the Monday that week.
- Fill out a row on the day in which you are scheduling the upgrade. The day is going to be the local server time.
Step 10: Follow up on the upgrade
- Ensure that we follow up with the upgrade and ensure that it ran well (make sure that you can launch a terminal and websites work.
- Let the customer know that it has been complete
If you do not work the day of the upgrade or for some reason are not able to check on the upgrade prior to the location opening, ensure you work with another team member to ensure this gets done.